We have been getting a lot of questions lately regarding image sizes for website design and WordPress posts so I decided to create a quick rundown regarding sizing and compressing images for WordPress. Oftentimes people simply upload an image into their WordPress media library without a second thought, not realizing that image size plays a huge part in website speed, SEO and overall optimization.
What Does Sizing and Compression Do For Me?
Sizing and compressing your images for WordPress has several benefits, but the two we want to focus on are site speed / load time and SEO… both of which are very important when it comes to the overall standing of your website. Google continues to penalize sites for slow load times and image issues. Sizing your images properly and then using some sort of compression plugin or online compression tool keeps your site speed up and makes sure your SEO optimization is on point.
High resolution images that are too big can really lower your page speed to the point where Google will start to hit you hard. Not to mention that the slower the site speed the less likely your visitors are to stay on your site. Wasting page speed and site resources is a great way to really push people away from your site.
Sizing and Compression Plugins and Online Tools
Basically you have a couple different ways to go here. You can either decide to get a WordPress image optimization plugin, or you can find and use one of several high quality online tools. I have done both, and while both have their advantages I have settled into using an online image compression tool that is fast, easy and free. Now, you may choose to go the plugin route for one reason or another. Depending on your situation and what all you are trying to accomplish with your images will determine what type of image compression plugin you use.
If you are interested in some of the best WordPress image optimization plugins available, then check out Raelene Morey’s “10 Best Image Optimization Plugins to Speed Up Your WordPress Site.” She has already laid out and given a ton of information on what she thinks are the best WordPress image optimization plugins.
When I work with clients and whenever I am teaching them how to configure images I usually always use an online tool called Tiny PNG. While there are other online tools available for this type of compression I have found Tiny PNG to be the best for what we are usually doing for clients. Not only is it very easy to use, but the tool always works and of course…. it is free, which obviously attracts a lot of people.
How To Size and Compress Images for WordPress
Let’s just go through the routine we use here more often than not at Eleven Tree Media. Unless you are using a huge image for some front page across site image, or huge header image for something, then you really don’t ever need to upload images that are any bigger than 1000px X 1000px… and that is pushing it. This goes for images used in everything… posts, pages, WooCommerce… etc.
Step 1: Image Sizing
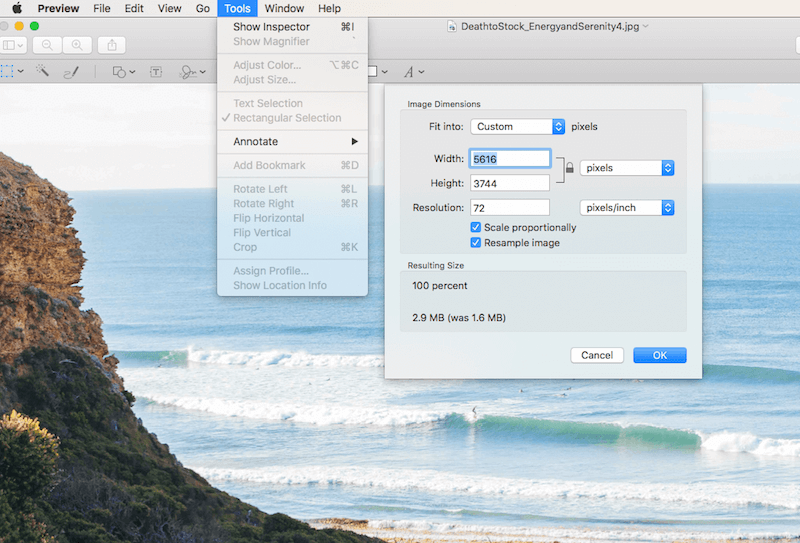
Apple: Open your image up and size it down using your tool of choice. On a Mac you simply open the image in “Preview” and in toolbar area you will see a “Tools” option. Click on tools > adjust size and adjust the size accordingly. Again, anything over 1000px across is overdoing it and more often than not your image needs will be smaller. Once you adjust the size your image will be ready for compression.

PC: If you are using a PC there are a few different options, but the easiest way to size an image quickly is to follow the steps in the video below.
Step 2: Image Compression
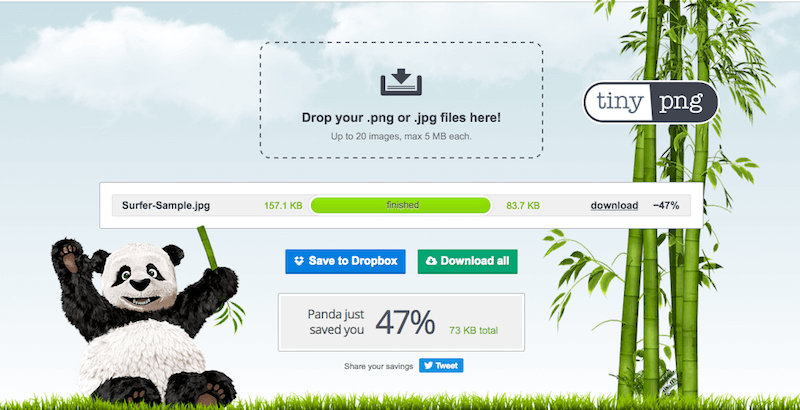
At this point your image is now sized down and is ready for compression. Take the image or images you recently sized and head over to Tiny PNG You will immediately see where to drag and drop images. You simply drag your images into the drop area and Tiny PNG will do the rest. You will see the compression numbers and be able to see the amount of space that the compression engine is saving you.
There is also detailed documentation about image quality and how your images remain high quality even after the compression, so feel free to view that. If you are skeptical go ahead and download the newly compressed file, open it, and compare it to the image that hasn’t been compressed. You will not see a difference. I have run a sample for you and posted the results in the screenshot below.

Final Thoughts
These days it isn’t enough to just add images to your website. Whatever type of website you are running it is very important to address the issue of sizing and compressing images for WordPress. Whether you are running an online eCommerce site, a business site with a blog, or a full online blog, making sure your images are nice and tight will insure that you are not sacrificing site speed, SEO or site resources.


Leave a Reply